Traditional PC gaming is all about having beefy hardware.
Have good Graphics card, CPU, and RAM in your PC – and you’re done.
But this approach isn’t perfect anymore.
Why? Because there are only a few number of PC games nowadays that aren’t online. Even some offline games (such as GTA 5) have an online mode.
In online games, having a good internet connection is even important than having powerful hardware.
It’s because often times these online games are hosted on a server, and you only provide inputs (through your keyboard and mouse) to control the state of that game. So, a large amount of data flows between the gaming server and client PCs, and if your internet lag somehow, you’ll lose that game.
That’s why if you’re into online gaming, read this post carefully because now we’ll talk about 5 different ways to optimize your home network for online gaming.
1. Switch to Wired Connection If Possible
Wireless networks are now preferred due to their convenience and ease of use. But what most people don’t realize is that WiFi networks are slower than Ethernet connections, and also prone to interference.
Single band WiFi routers operate on 2.4 GHz, the same frequency range that is used by microwaves and baby monitors. This issue can be resolved by using a Dual-Band router (more on that later) but if you’re having ping-related issues during online games, only an Ethernet connection can solve it effectively.
I used the word ‘possible’ in the headline above because wired connections are messy and laying cables all over your house is both expensive and time consuming.
So, if you want to stick with a WiFi network and enjoy online gaming at the same time, keep on reading this post because all of next steps are related to WiFi networks only.
2. Use a Dual-Band / Tri-Band Router
As I said earlier, single band router are prone to interference due to the 2.4 GHz band being used by many other devices. That’s why you should get a Dual-band/Tri-Band router in order to get rid of this issue.
Dual-band router operates on two bands. In addition of the regular 2.4 GHz band, they have a 5 GHz Band for high speed connections. Tri-Band routers are just like their dual-band siblings, except for the fact that they have not one but two 5 GHz frequency Band.
This extra 5 GHz Band comes helpful if you have a lot of connected devices (let’s say 15+) at the same time.
Apart from this, there are different types of routers, based on the WiFi standard (802.11) they support, such as 802.11a or 802.11n, with the latest being 802.11ac.
For gaming, 802.11ac routers are best (doesn’t matter if it’s dual-band or tri-band) since they provide extra helpful features such as MU-MIMO and Beamforming.
In case you’re not sure about your choice, there are plenty of guides online, that can help you find a suitable router.
3. Forward Ports On Your Router
You can consider ports as the pipes through which data flows. All the data transfer is done through data ports. Although router automatically opens ports by default, opening a port manually will improve the lag, which will in turn improve your overall online gaming performance.
The process of opening a router’s port is called port forwarding.
Using port forwarding you can also specify the type of data to be passed through each port.
Each time a device connects to WiFi network, it’s assigned to new IP address. So, in order to do port forwarding, we must have static IP for our PC first.
Here’s the step by step process to do this.
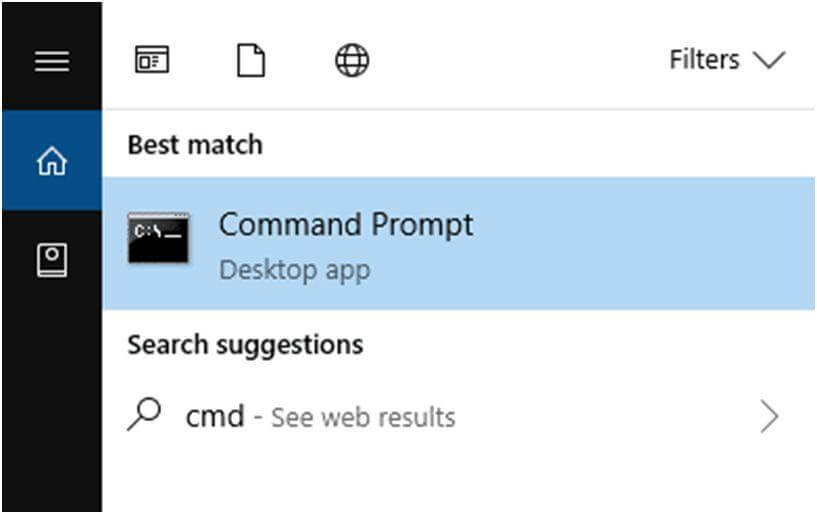
Open Command Prompt by going to start menu and typing cmd in search bar.
In command prompt, type this: ipconfig/all, and press Enter.
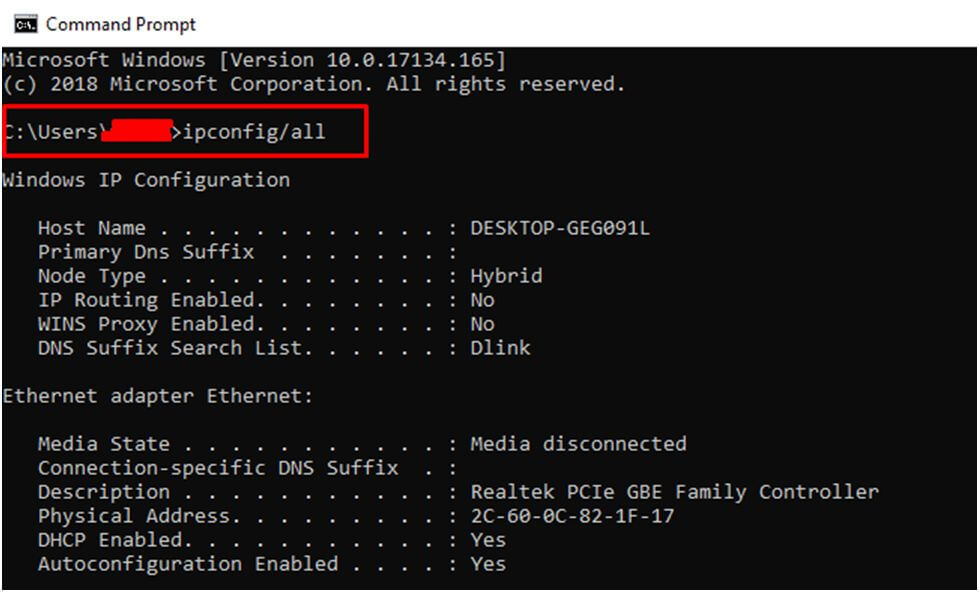
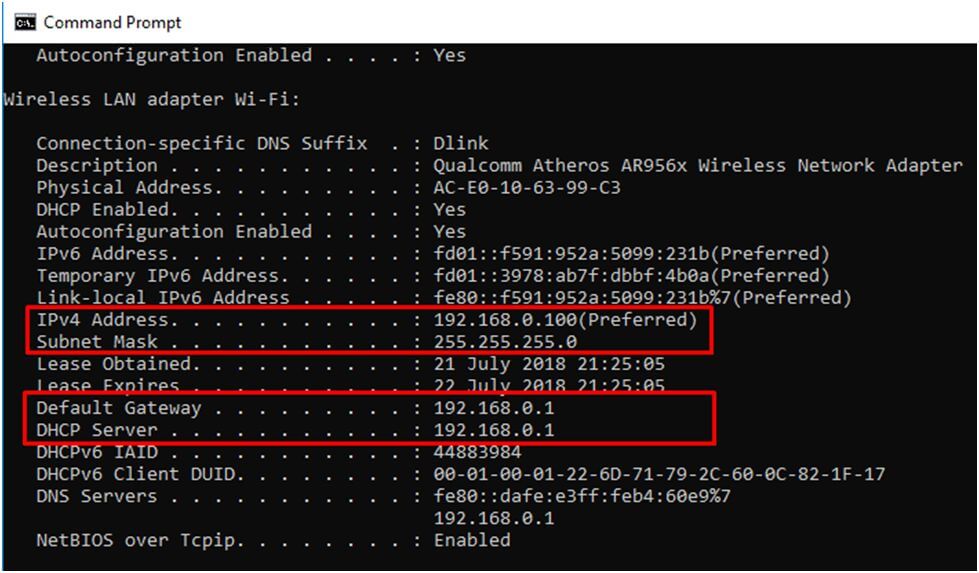
You’ll be shown a lot of different fields. In those fields, you need to note down records for IPv4 Address, Subnet Mask, Default Gateway, and DNS Servers.
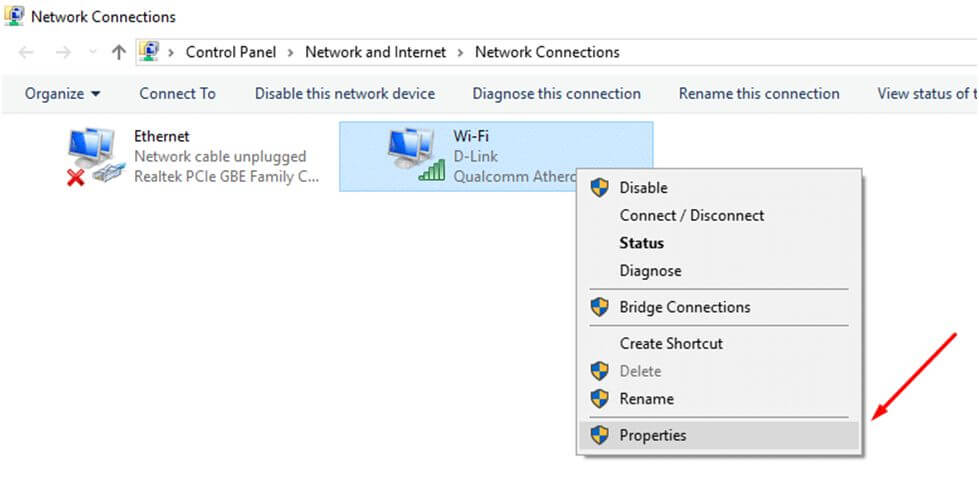
Once you’ve noted down these numbers, go to search bar in start menu again and type ncpa.cpl (to open Network Connections in control panel)
In network connections box, right click on the internet connection that you’re currently using, and click on properties.
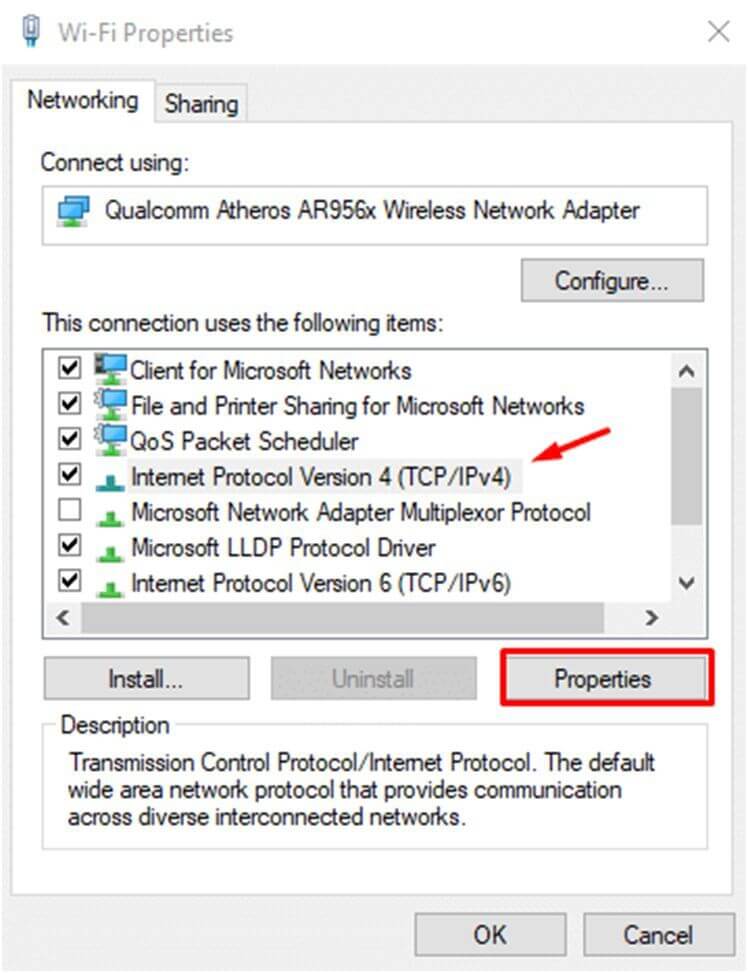
Click on Internet Protocol Version 4 (TCP/IPv4) from the list , and then click on properties.
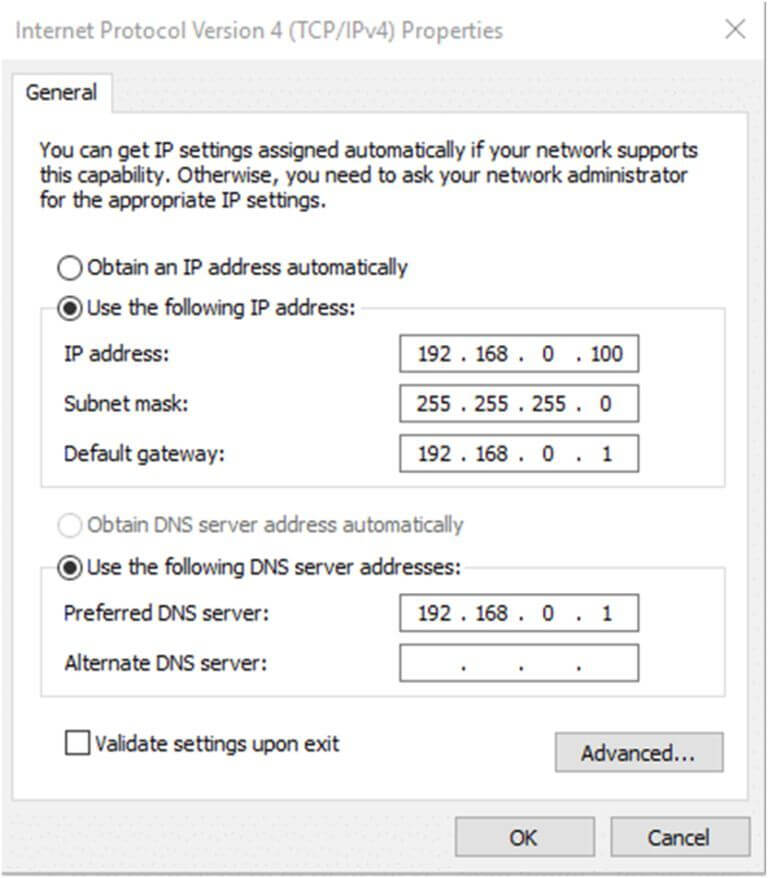
A new screen will open. Here you’ll put the new IP addresses for subnet mask, default gateway, and DNS servers. For IP address, select a number similar to the IPv4 address, but with a different final digit.
For example, if the IPv4 address was 192.168.0.1, choose 192.168.0.10. The final number can be anything from 1 to 254, but should be different from the default gateway address.
and press OK.
Now that we have set up a static IP address for our PC, we’ll come to our main task (port forwarding).
Note: The following process is specific for Netgear routers. If you’re using router from any other company (such as TP-Link), it’s better to do your research before starting it.
For port forwarding, you need to go to admin panel of your router, and locate port forwarding settings. These settings have different labels in each router, such as Port Forwarding, Port Triggering, or Applications & Gaming, so you may have to dig up a little bit here.
In the meantime, also find out the port number for that game. Every game has a specific port number(s) that you can easily find out. World of Warcraft, for example, uses 1119 and 3274 port numbers. That being said, there is a possibility that some games/applications may use a range of ports.
Once you’re in port forwarding menu, you’ll have to create a new port forwarding rule. Here it’ll be labelled as Add Custom Service.
In Service Name field, enter a unique/descriptive name for new rule. In Service Type field, select TCP/UDP.
After this, if your game uses a single port number, enter the port number in External Starting Port and External Ending Port fields. On the other hand, if you have a range of port numbers, put first number in External starting point fields and the last number in External Ending point fields.
Now do same thing with Internal Starting Port and Internal Ending Port fields. In Internal IP address field, enter the static IP address we found out earlier, and you’re done. Click Apply, and you have successfully opened a port in your router.
4. Set Router QoS
QoS (Quality of Service) is a bandwidth controlling featuring found in many high-end routers. Using this feature you can prioritize traffic in your home network.
Imagine you’re playing PUBG while your little sibling is streaming some useless HD videos on YouTube. Under normal circumstances, you’ll get some lag. But if QoS is enabled on your router, you can easily de-prioritize specific type of sites or data (YouTube/videos in this case).
Some routers offer QoS by default, such as x4S from Netgear which automatically has 4 levels of prioritization.
- Highest: VoIP
- High: Gaming
- Normal: General web traffic
- Low: Torrents
As you can see, QoS is something really important if you want to optimize your WiFi network for gaming. In fact, it’s one of the most important things a gaming router should have.
5. Use USB wireless adapters with gaming laptops
Gaming laptops outperforms traditional laptops in almost every way. They have heavy duty graphics card, overclocked CPU, as well as mechanical keyboard.
But one area where both normal and gaming laptops suck is the built-in wi-fi adapter.
Their built-in wifi adapters are often outdated and don’t let you utilize powerful features of your high-end modems and routers. For this reason, if you are the one who plays games in their gaming laptops, you should get a usb wifi adapter. These adapters are small, offer plug and play convenience, and provide faster speed as well as strong wifi reception when compared to their built-in counterparts.
Conclusion
So that was it. You have learned 5 ways to optimize your home network for online gaming. A single one of these features may not be enough, but if you apply all of them collectively, they will surely do the job. Follow these steps, and share your experience in the comment section.
Great blog here! Also your website loads up very fast!
What host are you using? Can I get your affiliate
link to your host? I wish my site loaded up as quickly as yours
lol